Gần đây mình nhận được khá nhiều câu hỏi kiểu "làm sao để nhúng chatbot AI vào website có sẵn?". Phần lớn anh em nghĩ đến việc dùng widget của bên thứ ba — Tidio, Intercom, hay nhúng thẳng iframe ChatGPT vào. Nhanh thì nhanh thật, nhưng bạn sẽ gặp một đống giới hạn: không custom được knowledge base theo ý muốn, không kiểm soát prompt, không integrate với business logic sẵn có, và phụ thuộc hoàn toàn vào vendor.
Bài viết này chia sẻ cách mình build chatbot AI từ đầu, dùng .NET làm backend, Angular làm frontend, kết nối OpenAI API, và dùng SignalR để stream response real-time. Không phải kiểu tutorial chạy xong rồi bỏ — mà là kiến trúc đủ để mang lên production.
Kiến trúc tổng quan
Trước khi nhảy vào code, cần hình dung rõ các thành phần và luồng dữ liệu:
Angular Frontend
    ↓ (SignalR WebSocket)
.NET Backend API
    ├── ChatHub (SignalR)
    ├── ChatService (business logic)
    ├── OpenAI Client (streaming)
    └── Chat History Store (EF Core / Redis)
Luồng hoạt động đơn giản thế này: user gõ message ở Angular → gửi qua SignalR đến backend → backend gọi OpenAI API với streaming → mỗi chunk token nhận được sẽ push ngay về client qua SignalR → Angular render từng token real-time, tạo cảm giác AI đang "gõ" giống ChatGPT.
Tại sao dùng SignalR thay vì REST API bình thường? Vì REST không hỗ trợ streaming tốt. Bạn có thể dùng Server-Sent Events (SSE), nhưng SignalR cho phép giao tiếp hai chiều — sau này muốn thêm tính năng như typing indicator, user online status, hay multi-user chat thì không cần refactor.
Backend .NET: thiết lập project
Tạo project Web API:
dotnet new webapi -n ChatbotApi
cd ChatbotApi
dotnet add package Microsoft.AspNetCore.SignalR
dotnet add package Azure.AI.OpenAI --prerelease
# hoặc nếu dùng OpenAI trực tiếp
dotnet add package OpenAI
Cấu hình OpenAI Client
Tạo service wrapper cho OpenAI:
public class OpenAiSettings
{
    public string ApiKey { get; set; } = string.Empty;
    public string Model { get; set; } = "gpt-4o";
    public string SystemPrompt { get; set; } = string.Empty;
}

public class AiChatService
{
    private readonly OpenAIClient _client;
    private readonly OpenAiSettings _settings;

    public AiChatService(IOptions<OpenAiSettings> settings)
    {
        _settings = settings.Value;
        _client = new OpenAIClient(_settings.ApiKey);
    }

    public async IAsyncEnumerable<string> StreamResponseAsync(
        List<ChatMessage> history,
        [EnumeratorCancellation] CancellationToken ct = default)
    {
        var chatClient = _client.GetChatClient(_settings.Model);

        var messages = new List<OpenAI.Chat.ChatMessage>
        {
            ChatMessage.CreateSystemMessage(_settings.SystemPrompt)
        };

        // thêm lịch sử hội thoại
        foreach (var msg in history)
        {
            if (msg.Role == "user")
                messages.Add(ChatMessage.CreateUserMessage(msg.Content));
            else
                messages.Add(ChatMessage.CreateAssistantMessage(msg.Content));
        }

        var options = new ChatCompletionOptions
        {
            MaxOutputTokenCount = 2048,
            Temperature = 0.7f,
        };

        await foreach (var update in chatClient
            .CompleteChatStreamingAsync(messages, options, ct))
        {
            foreach (var part in update.ContentUpdate)
            {
                if (!string.IsNullOrEmpty(part.Text))
                    yield return part.Text;
            }
        }
    }
}
Điểm quan trọng ở đây là IAsyncEnumerable<string> — thay vì chờ toàn bộ response rồi trả về một lần, mình yield từng chunk text ngay khi nhận được từ OpenAI. Đây là nền tảng cho streaming.
SignalR Hub
public class ChatHub : Hub
{
    private readonly AiChatService _aiService;
    private readonly IChatHistoryStore _historyStore;
    private readonly ILogger<ChatHub> _logger;

    public ChatHub(
        AiChatService aiService,
        IChatHistoryStore historyStore,
        ILogger<ChatHub> logger)
    {
        _aiService = aiService;
        _historyStore = historyStore;
        _logger = logger;
    }

    public async Task SendMessage(string conversationId, string message)
    {
        // lưu message của user
        await _historyStore.AddMessageAsync(conversationId, "user", message);

        // lấy lịch sử hội thoại
        var history = await _historyStore.GetHistoryAsync(conversationId);

        // thông báo cho client biết bot đang typing
        await Clients.Caller.SendAsync("BotTypingStarted");

        var fullResponse = new StringBuilder();

        try
        {
            await foreach (var chunk in _aiService.StreamResponseAsync(history))
            {
                fullResponse.Append(chunk);
                // gửi từng chunk về client ngay lập tức
                await Clients.Caller.SendAsync("ReceiveChunk", chunk);
            }

            // gửi signal hoàn thành
            await Clients.Caller.SendAsync("BotTypingStopped");

            // lưu full response vào history
            await _historyStore.AddMessageAsync(
                conversationId, "assistant", fullResponse.ToString());
        }
        catch (Exception ex)
        {
            _logger.LogError(ex, "Error streaming response");
            await Clients.Caller.SendAsync("BotError",
                "Có lỗi xảy ra, vui lòng thử lại.");
            await Clients.Caller.SendAsync("BotTypingStopped");
        }
    }

    public async Task LoadHistory(string conversationId)
    {
        var history = await _historyStore.GetHistoryAsync(conversationId);
        await Clients.Caller.SendAsync("ReceiveHistory", history);
    }
}
Mỗi khi nhận được một chunk từ OpenAI, Hub gọi Clients.Caller.SendAsync("ReceiveChunk", chunk) để push ngay về đúng client đang chat. Không broadcast cho tất cả, chỉ gửi cho caller.
Chat History Store
Mình dùng interface để dễ swap implementation — có thể dùng EF Core cho persistence hoặc Redis cho tốc độ:
public interface IChatHistoryStore
{
    Task<List<ChatMessage>> GetHistoryAsync(string conversationId);
    Task AddMessageAsync(string conversationId, string role, string content);
    Task ClearHistoryAsync(string conversationId);
}

public class ChatMessage
{
    public string Id { get; set; } = Guid.NewGuid().ToString();
    public string ConversationId { get; set; } = string.Empty;
    public string Role { get; set; } = string.Empty;
    public string Content { get; set; } = string.Empty;
    public DateTime CreatedAt { get; set; } = DateTime.UtcNow;
}

// implementation đơn giản với EF Core
public class EfChatHistoryStore : IChatHistoryStore
{
    private readonly ChatDbContext _db;

    public EfChatHistoryStore(ChatDbContext db) => _db = db;

    public async Task<List<ChatMessage>> GetHistoryAsync(string conversationId)
    {
        return await _db.ChatMessages
            .Where(m => m.ConversationId == conversationId)
            .OrderBy(m => m.CreatedAt)
            .Take(50) // giới hạn context window
            .AsNoTracking()
            .ToListAsync();
    }

    public async Task AddMessageAsync(
        string conversationId, string role, string content)
    {
        _db.ChatMessages.Add(new ChatMessage
        {
            ConversationId = conversationId,
            Role = role,
            Content = content
        });
        await _db.SaveChangesAsync();
    }

    public async Task ClearHistoryAsync(string conversationId)
    {
        await _db.ChatMessages
            .Where(m => m.ConversationId == conversationId)
            .ExecuteDeleteAsync();
    }
}
Lưu ý cái .Take(50) — bạn không muốn gửi toàn bộ lịch sử 500 messages vào OpenAI. Context window có giới hạn, và mỗi token input đều tốn tiền. Tùy model mà bạn chọn con số phù hợp — 20-50 messages gần nhất thường đủ cho ngữ cảnh.
Đăng ký services
// Program.cs
var builder = WebApplication.CreateBuilder(args);

builder.Services.Configure<OpenAiSettings>(
    builder.Configuration.GetSection("OpenAI"));

builder.Services.AddSingleton<AiChatService>();
builder.Services.AddScoped<IChatHistoryStore, EfChatHistoryStore>();
builder.Services.AddDbContext<ChatDbContext>(options =>
    options.UseSqlServer(builder.Configuration
        .GetConnectionString("Default")));

builder.Services.AddSignalR();

builder.Services.AddCors(options =>
{
    options.AddPolicy("Angular", policy =>
        policy.WithOrigins("http://localhost:4200")
              .AllowAnyHeader()
              .AllowAnyMethod()
              .AllowCredentials()); // bắt buộc cho SignalR
});

var app = builder.Build();

app.UseCors("Angular");
app.MapHub<ChatHub>("/chathub");
app.Run();
Đừng quên .AllowCredentials() trong CORS policy — SignalR cần nó cho WebSocket handshake. Thiếu dòng này thì connection sẽ fail mà error message rất chung chung, debug mệt lắm.
Cài đặt SignalR client
cd angular-app
npm install @microsoft/signalr
SignalR Service
// chat-signalr.service.ts
import { Injectable } from '@angular/core';
import {
  HubConnection,
  HubConnectionBuilder,
  LogLevel,
} from '@microsoft/signalr';
import { BehaviorSubject, Subject } from 'rxjs';

export interface ChatMessage {
  role: 'user' | 'assistant';
  content: string;
  timestamp: Date;
}

@Injectable({ providedIn: 'root' })
export class ChatSignalrService {
  private hub!: HubConnection;
  private _messages = new BehaviorSubject<ChatMessage[]>([]);
  private _isTyping = new BehaviorSubject<boolean>(false);
  private _currentChunk = new Subject<string>();

  messages$ = this._messages.asObservable();
  isTyping$ = this._isTyping.asObservable();
  currentChunk$ = this._currentChunk.asObservable();

  private conversationId = crypto.randomUUID();
  private pendingResponse = '';

  async connect(): Promise<void> {
    this.hub = new HubConnectionBuilder()
      .withUrl('https://localhost:5001/chathub')
      .withAutomaticReconnect([0, 2000, 5000, 10000])
      .configureLogging(LogLevel.Warning)
      .build();

    // nhận từng chunk
    this.hub.on('ReceiveChunk', (chunk: string) => {
      this.pendingResponse += chunk;
      this._currentChunk.next(chunk);
      this.updateLastAssistantMessage(this.pendingResponse);
    });

    // bot bắt đầu typing
    this.hub.on('BotTypingStarted', () => {
      this._isTyping.next(true);
      this.pendingResponse = '';
      // thêm message rỗng cho assistant, sẽ fill dần
      this.addMessage({ role: 'assistant', content: '', timestamp: new Date() });
    });

    // bot typing xong
    this.hub.on('BotTypingStopped', () => {
      this._isTyping.next(false);
    });

    // nhận error
    this.hub.on('BotError', (error: string) => {
      this.updateLastAssistantMessage(error);
    });

    // load history
    this.hub.on('ReceiveHistory', (history: ChatMessage[]) => {
      this._messages.next(history);
    });

    await this.hub.start();
    await this.hub.invoke('LoadHistory', this.conversationId);
  }

  async sendMessage(content: string): Promise<void> {
    this.addMessage({ role: 'user', content, timestamp: new Date() });
    await this.hub.invoke('SendMessage', this.conversationId, content);
  }

  private addMessage(msg: ChatMessage): void {
    const current = this._messages.getValue();
    this._messages.next([...current, msg]);
  }

  private updateLastAssistantMessage(content: string): void {
    const msgs = [...this._messages.getValue()];
    const lastIdx = msgs.length - 1;
    if (lastIdx >= 0 && msgs[lastIdx].role === 'assistant') {
      msgs[lastIdx] = { ...msgs[lastIdx], content };
      this._messages.next(msgs);
    }
  }

  async disconnect(): Promise<void> {
    await this.hub?.stop();
  }
}
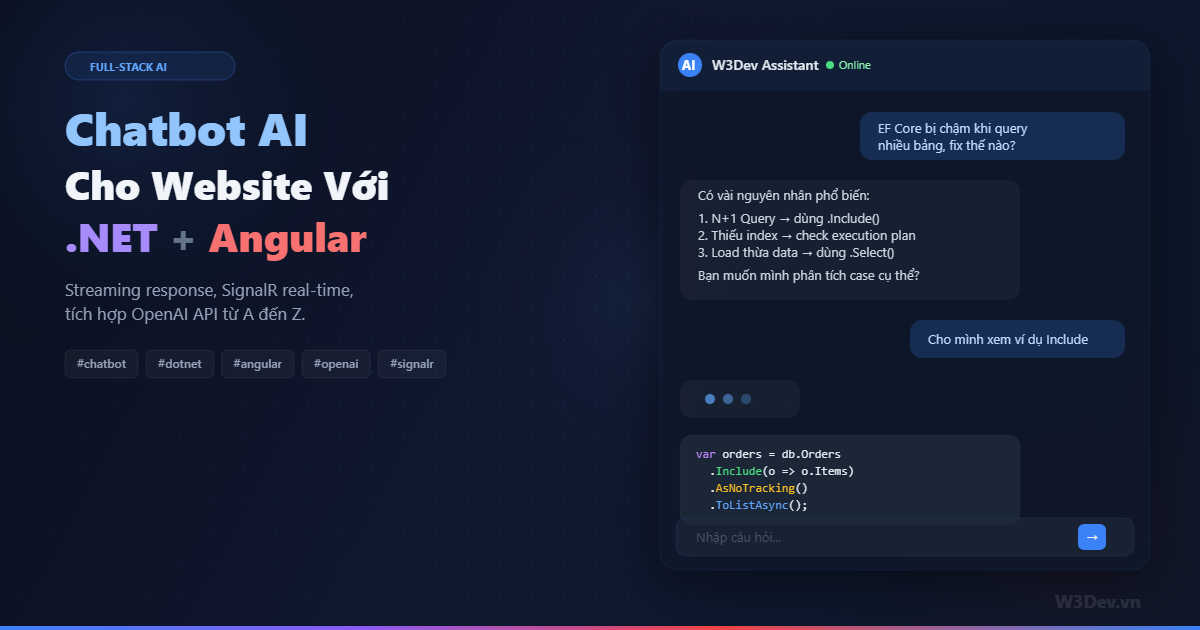
Logic streaming phía client hoạt động thế này: khi nhận BotTypingStarted, tạo sẵn một message assistant rỗng. Mỗi khi nhận ReceiveChunk, append chunk vào pendingResponse rồi update message cuối cùng. Kết quả là UI render từng từ một, giống hệt trải nghiệm ChatGPT.
Chat Component
// chat-widget.component.ts
import { Component, OnInit, OnDestroy, ViewChild, ElementRef } from '@angular/core';
import { ChatSignalrService, ChatMessage } from './chat-signalr.service';
import { Observable } from 'rxjs';

@Component({
  selector: 'app-chat-widget',
  template: `
    <div class="chat-container" [class.open]="isOpen">
      <!-- toggle button -->
      <button class="chat-toggle" (click)="isOpen = !isOpen">
        <span *ngIf="!isOpen">💬</span>
        <span *ngIf="isOpen">✕</span>
      </button>

      <!-- chat panel -->
      <div class="chat-panel" *ngIf="isOpen">
        <div class="chat-header">
          <div class="bot-avatar">AI</div>
          <div>
            <strong>W3Dev Assistant</strong>
            <small class="status-online">Online</small>
          </div>
        </div>

        <div class="chat-messages" #messagesContainer>
          <div
            *ngFor="let msg of messages$ | async"
            [class]="'message ' + msg.role">
            <div class="bubble" [innerHTML]="msg.content | markdown">
            </div>
          </div>

          <div class="typing-indicator" *ngIf="isTyping$ | async">
            <span></span><span></span><span></span>
          </div>
        </div>

        <div class="chat-input">
          <input
            #inputField
            [(ngModel)]="inputText"
            (keyup.enter)="send()"
            placeholder="Nhập câu hỏi..."
            [disabled]="isTyping$ | async" />
          <button (click)="send()" [disabled]="!inputText.trim()">
            Gửi
          </button>
        </div>
      </div>
    </div>
  `,
})
export class ChatWidgetComponent implements OnInit, OnDestroy {
  @ViewChild('messagesContainer') messagesContainer!: ElementRef;

  messages$: Observable<ChatMessage[]>;
  isTyping$: Observable<boolean>;
  isOpen = false;
  inputText = '';

  constructor(private chatService: ChatSignalrService) {
    this.messages$ = this.chatService.messages$;
    this.isTyping$ = this.chatService.isTyping$;
  }

  async ngOnInit() {
    await this.chatService.connect();

    // auto scroll khi có message mới
    this.messages$.subscribe(() => {
      setTimeout(() => this.scrollToBottom(), 50);
    });
  }

  async send() {
    const text = this.inputText.trim();
    if (!text) return;
    this.inputText = '';
    await this.chatService.sendMessage(text);
  }

  private scrollToBottom() {
    const el = this.messagesContainer?.nativeElement;
    if (el) el.scrollTop = el.scrollHeight;
  }

  async ngOnDestroy() {
    await this.chatService.disconnect();
  }
}
Component này chỉ làm đúng một việc: hiển thị messages và gửi input. Toàn bộ logic SignalR nằm trong service. Mình cố ý tách như vậy vì sau này bạn có thể swap widget thành full-page chat, embed vào trang khác, hoặc thậm chí làm mobile app — chỉ cần thay component, service giữ nguyên.
Markdown Pipe
Bot response thường chứa markdown — code block, bold, list. Bạn cần render nó đúng cách:
// markdown.pipe.ts
import { Pipe, PipeTransform } from '@angular/core';
import { marked } from 'marked';
import DOMPurify from 'dompurify';

@Pipe({ name: 'markdown' })
export class MarkdownPipe implements PipeTransform {
  transform(value: string): string {
    if (!value) return '';
    const html = marked.parse(value, { async: false }) as string;
    return DOMPurify.sanitize(html); // XSS protection
  }
}
DOMPurify.sanitize() rất quan trọng — bạn đang render HTML từ AI response, nếu không sanitize thì rất dễ bị XSS injection. Đừng bao giờ bỏ qua bước này.
System Prompt — linh hồn của chatbot
Chatbot thông minh hay ngu hoàn toàn phụ thuộc vào system prompt. Đây là ví dụ prompt mình dùng cho chatbot hỗ trợ sản phẩm:
{
  "OpenAI": {
    "ApiKey": "sk-...",
    "Model": "gpt-4o",
    "SystemPrompt": "Bạn là trợ lý AI của W3Dev.vn — một nền tảng chia sẻ kiến thức lập trình .NET và web development.\n\n## Vai trò\n- Trả lời câu hỏi về .NET, C#, Angular, SQL Server, Azure\n- Hướng dẫn debug lỗi, review code\n- Gợi ý best practice và design pattern\n\n## Quy tắc\n- Trả lời bằng tiếng Việt, ngắn gọn, có code ví dụ khi cần\n- KHÔNG bịa thông tin. Nếu không chắc, nói rõ.\n- Khi đưa code, luôn giải thích tại sao viết như vậy\n- Không trả lời những câu hỏi không liên quan đến lập trình\n\n## Format\n- Dùng markdown cho code block\n- Trả lời tối đa 300 từ trừ khi user yêu cầu giải thích chi tiết"
  }
}
Xử lý những vấn đề thực tế
Rate Limiting
Bạn không muốn một user spam 100 request/phút vào OpenAI API và đốt hết credit. Thêm rate limiting ở Hub:
public class ChatHub : Hub
{
    private static readonly ConcurrentDictionary<string, SemaphoreSlim>
        _userLocks = new();
    private static readonly ConcurrentDictionary<string, DateTime>
        _lastMessageTime = new();

    public async Task SendMessage(string conversationId, string message)
    {
        var connectionId = Context.ConnectionId;

        // rate limit: tối thiểu 2 giây giữa các message
        if (_lastMessageTime.TryGetValue(connectionId, out var lastTime)
            && DateTime.UtcNow - lastTime < TimeSpan.FromSeconds(2))
        {
            await Clients.Caller.SendAsync("BotError",
                "Bạn gửi tin nhắn quá nhanh, vui lòng chờ một chút.");
            return;
        }
        _lastMessageTime[connectionId] = DateTime.UtcNow;

        // đảm bảo mỗi user chỉ có 1 request đến OpenAI tại một thời điểm
        var semaphore = _userLocks.GetOrAdd(connectionId, _ => new SemaphoreSlim(1, 1));
        if (!await semaphore.WaitAsync(0))
        {
            await Clients.Caller.SendAsync("BotError",
                "Đang xử lý câu hỏi trước, vui lòng đợi.");
            return;
        }

        try
        {
            // ... logic gọi AI như trên
        }
        finally
        {
            semaphore.Release();
        }
    }
}
Token Counting và Cost Control
OpenAI tính tiền theo token. Bạn cần biết mỗi conversation đang tốn bao nhiêu:
public class TokenEstimator
{
    // ước tính đơn giản: ~4 ký tự = 1 token cho tiếng Anh
    // tiếng Việt thường tốn hơn, ~2-3 ký tự = 1 token
    public static int EstimateTokens(string text)
    {
        return (int)Math.Ceiling(text.Length / 2.5);
    }

    public static int EstimateConversationTokens(List<ChatMessage> history)
    {
        return history.Sum(m => EstimateTokens(m.Content)) + 50; // overhead
    }
}
Trong AiChatService, kiểm tra trước khi gọi API:
var estimatedTokens = TokenEstimator.EstimateConversationTokens(history);
if (estimatedTokens > 6000) // threshold tùy model
{
    // trim history, giữ lại system prompt + 10 messages gần nhất
    history = history.TakeLast(10).ToList();
}
Connection Resilience
SignalR connection có thể mất bất cứ lúc nào — user chuyển tab, mạng chập chờn, server restart. Phía Angular đã config withAutomaticReconnect, nhưng phía UI cũng cần handle:
// trong ChatSignalrService
this.hub.onreconnecting(() => {
  console.warn('SignalR reconnecting...');
  // hiển thị banner "Đang kết nối lại..."
});

this.hub.onreconnected(() => {
  console.log('SignalR reconnected');
  // reload history
  this.hub.invoke('LoadHistory', this.conversationId);
});

this.hub.onclose(() => {
  console.error('SignalR connection closed');
  // hiển thị nút "Kết nối lại"
});
Deploy lên production
Một vài lưu ý khi deploy:
Sticky Sessions. Nếu backend chạy nhiều instance (load balancer), SignalR cần sticky session để WebSocket connection luôn đến đúng server. Hoặc dùng Azure SignalR Service / Redis backplane để các instance sync với nhau.
HTTPS bắt buộc. WebSocket qua HTTP (ws://) sẽ bị block bởi nhiều proxy và firewall. Luôn dùng wss:// (WebSocket Secure).
API Key bảo mật. OpenAI API key TUYỆT ĐỐI không được để ở frontend. Toàn bộ communication với OpenAI phải đi qua backend. Key lưu trong environment variable hoặc Azure Key Vault, không commit vào source code.
Giới hạn message length. Validate input ở cả frontend lẫn backend. Không cho user gửi message dài quá 2000 ký tự — vừa tốn token, vừa có risk prompt injection.
Tổng kết
Toàn bộ stack hoạt động như sau: Angular widget gửi message qua SignalR WebSocket → .NET Hub nhận, gọi OpenAI API với streaming → mỗi chunk token push ngay về client → Angular render real-time.
Cái hay của cách làm này là bạn kiểm soát hoàn toàn mọi thứ: system prompt tùy chỉnh theo business, chat history lưu trong DB của mình, rate limiting và cost control theo ý muốn, và UI/UX không bị giới hạn bởi widget của bên thứ ba.
Project demo đầy đủ khoảng 500-600 dòng code cả backend lẫn frontend. Không nhiều, nhưng đủ để chạy production nếu bạn thêm authentication và monitoring. Phần khó nhất không phải code — mà là viết system prompt đủ tốt để chatbot thực sự hữu ích cho người dùng.

Leave a comment
Your email address will not be published. Required fields are marked *