Template-driven forms trong Angular đơn giản, nhanh, và đủ dùng cho form login hay form contact. Nhưng khi bạn cần form tạo invoice với dynamic line items, form đăng ký nhiều bước có validation chéo giữa các field, hay form cấu hình hệ thống với nested object sâu 3-4 tầng — template-driven sẽ biến thành mớ hỗn độn ngModel mà không ai muốn maintain.
Reactive Forms giải quyết đúng vấn đề này. Toàn bộ logic form nằm trong TypeScript — validation, dynamic fields, state management — tất cả có thể test được, debug được, và quan trọng nhất là đọc được.
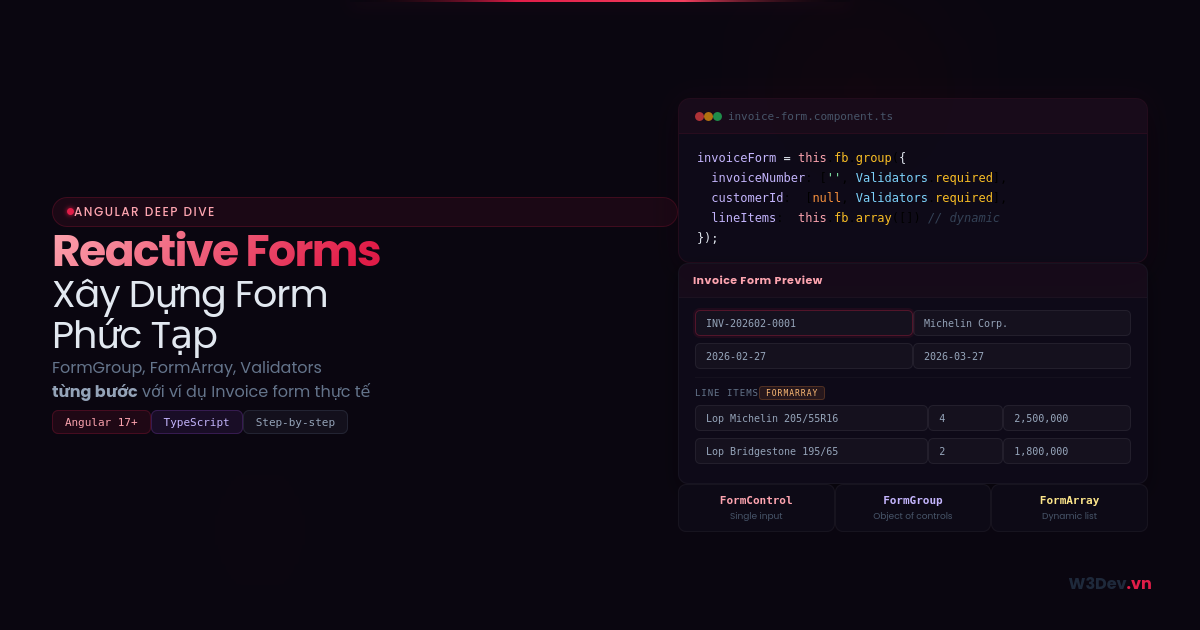
Bài viết này mình đi từ những khái niệm nền tảng đến xây dựng form phức tạp thực tế. Ví dụ xuyên suốt là form tạo Invoice — form mà hầu như dự án nào cũng có một biến thể, và đủ phức tạp để cover hầu hết pattern bạn cần biết.
Nền tảng: FormControl, FormGroup, FormArray
Trước khi xây form phức tạp, cần nắm chắc ba building block. Mình thấy nhiều developer nhảy thẳng vào FormArray mà chưa hiểu rõ FormControl — rồi debug mãi không ra.
FormControl — Đơn vị nhỏ nhất
Mỗi FormControl đại diện cho một input element. Nó giữ giá trị hiện tại, trạng thái validation (valid/invalid), trạng thái tương tác (touched/dirty), và danh sách error.
import { FormControl, Validators } from '@angular/forms';

// Tạo FormControl với giá trị mặc định và validation
const invoiceNumber = new FormControl('', [
  Validators.required,
  Validators.pattern(/^INV-\d{6}$/)
]);

// Đọc giá trị
console.log(invoiceNumber.value);        // ''
console.log(invoiceNumber.valid);        // false
console.log(invoiceNumber.errors);       // { required: true }

// Set giá trị
invoiceNumber.setValue('INV-000123');
console.log(invoiceNumber.valid);        // true
Một điều mình mất một lúc mới thấm: setValue() và patchValue() khác nhau. Với FormControl thì giống nhau, nhưng với FormGroup thì setValue() yêu cầu truyền đủ tất cả field, còn patchValue() cho phép truyền một phần. Quên điều này sẽ gặp runtime error khó hiểu khi load data từ API.
FormGroup — Nhóm các control lại
FormGroup gom nhiều FormControl thành một object — giống như một row trong form.
import { FormGroup, FormControl, Validators } from '@angular/forms';

const invoiceForm = new FormGroup({
  invoiceNumber: new FormControl('', Validators.required),
  customerId: new FormControl(null, Validators.required),
  issueDate: new FormControl(new Date().toISOString().split('T')[0]),
  dueDate: new FormControl('', Validators.required),
  notes: new FormControl('')
});

// Đọc toàn bộ giá trị
console.log(invoiceForm.value);
// { invoiceNumber: '', customerId: null, issueDate: '2026-02-27', ... }

// Kiểm tra toàn bộ form
console.log(invoiceForm.valid);  // false — vì có field required chưa fill
FormArray — Dynamic list
FormArray chứa danh sách FormControl hoặc FormGroup mà có thể thêm/xóa runtime. Đây là thứ khiến Reactive Forms mạnh hơn hẳn template-driven cho form phức tạp.
import { FormArray, FormGroup, FormControl } from '@angular/forms';

const lineItems = new FormArray([]);

// Thêm một line item
lineItems.push(new FormGroup({
  productName: new FormControl('', Validators.required),
  quantity: new FormControl(1, [Validators.required, Validators.min(1)]),
  unitPrice: new FormControl(0, [Validators.required, Validators.min(0)]),
}));

// Truy cập line item đầu tiên
const firstItem = lineItems.at(0) as FormGroup;
console.log(firstItem.get('productName')?.value);

// Xóa line item
lineItems.removeAt(0);
Bước 1: Setup module và tạo form cơ bản
Import ReactiveFormsModule trong module hoặc standalone component:
// Nếu dùng standalone component (Angular 17+)
@Component({
  standalone: true,
  imports: [CommonModule, ReactiveFormsModule],
  // ...
})
export class InvoiceFormComponent { }
Tạo form trong component:
import { Component, OnInit } from '@angular/core';
import { FormBuilder, FormGroup, FormArray, Validators } from '@angular/forms';

@Component({
  selector: 'app-invoice-form',
  standalone: true,
  imports: [CommonModule, ReactiveFormsModule],
  templateUrl: './invoice-form.component.html'
})
export class InvoiceFormComponent implements OnInit {
  invoiceForm!: FormGroup;

  constructor(private fb: FormBuilder) {}

  ngOnInit(): void {
    this.invoiceForm = this.fb.group({
      invoiceNumber: ['', Validators.required],
      customerId: [null, Validators.required],
      issueDate: [new Date().toISOString().split('T')[0], Validators.required],
      dueDate: ['', Validators.required],
      notes: [''],
      lineItems: this.fb.array([], Validators.required)
    });

    // Thêm một line item mặc định
    this.addLineItem();
  }

  get lineItems(): FormArray {
    return this.invoiceForm.get('lineItems') as FormArray;
  }

  addLineItem(): void {
    const item = this.fb.group({
      productName: ['', Validators.required],
      quantity: [1, [Validators.required, Validators.min(1)]],
      unitPrice: [0, [Validators.required, Validators.min(0)]],
    });
    this.lineItems.push(item);
  }

  removeLineItem(index: number): void {
    this.lineItems.removeAt(index);
  }
}
FormBuilder là shorthand cho new FormGroup(new FormControl(...)) — gọn hơn nhiều. Mình luôn dùng FormBuilder thay vì tạo thủ công.
Getter lineItems là pattern cần nhớ — bạn sẽ gọi nó rất nhiều lần trong template. Không có getter này, mỗi lần truy cập FormArray phải cast thủ công, code template sẽ rất rối.
Bước 2: Template — Bind form vào HTML
<form [formGroup]="invoiceForm" (ngSubmit)="onSubmit()">
  <!-- Header fields -->
  <div class="form-section">
    <div class="form-row">
      <div class="field">
        <label for="invoiceNumber">Số hóa đơn</label>
        <input id="invoiceNumber" formControlName="invoiceNumber" />
        <div class="error"
             *ngIf="invoiceForm.get('invoiceNumber')?.touched
                    && invoiceForm.get('invoiceNumber')?.hasError('required')">
          Số hóa đơn không được để trống
        </div>
      </div>

      <div class="field">
        <label for="customerId">Khách hàng</label>
        <select id="customerId" formControlName="customerId">
          <option [ngValue]="null" disabled>-- Chọn khách hàng --</option>
          <option *ngFor="let c of customers" [ngValue]="c.id">
            {{ c.name }}
          </option>
        </select>
        <div class="error"
             *ngIf="invoiceForm.get('customerId')?.touched
                    && invoiceForm.get('customerId')?.hasError('required')">
          Vui lòng chọn khách hàng
        </div>
      </div>
    </div>

    <div class="form-row">
      <div class="field">
        <label for="issueDate">Ngày phát hành</label>
        <input id="issueDate" type="date" formControlName="issueDate" />
      </div>

      <div class="field">
        <label for="dueDate">Hạn thanh toán</label>
        <input id="dueDate" type="date" formControlName="dueDate" />
      </div>
    </div>
  </div>

  <!-- Dynamic line items -->
  <div class="form-section">
    <h3>Chi tiết hóa đơn</h3>

    <div formArrayName="lineItems">
      <div *ngFor="let item of lineItems.controls; let i = index"
           [formGroupName]="i"
           class="line-item-row">

        <input formControlName="productName" placeholder="Tên sản phẩm" />
        <input formControlName="quantity" type="number" placeholder="SL" />
        <input formControlName="unitPrice" type="number" placeholder="Đơn giá" />

        <span class="line-total">
          {{ (item.get('quantity')?.value || 0) * (item.get('unitPrice')?.value || 0)
             | number:'1.0-0' }}
        </span>

        <button type="button" (click)="removeLineItem(i)"
                [disabled]="lineItems.length === 1">
          Xóa
        </button>
      </div>
    </div>

    <button type="button" (click)="addLineItem()">+ Thêm dòng</button>
  </div>

  <!-- Notes -->
  <div class="form-section">
    <label for="notes">Ghi chú</label>
    <textarea id="notes" formControlName="notes" rows="3"></textarea>
  </div>

  <!-- Total and submit -->
  <div class="form-footer">
    <div class="total">
      Tổng cộng: {{ calculateTotal() | number:'1.0-0' }} VNĐ
    </div>
    <button type="submit" [disabled]="invoiceForm.invalid">
      Tạo hóa đơn
    </button>
  </div>
</form>
Vài điều cần chú ý trong template:
formArrayName="lineItems" kết nối với FormArray. Bên trong dùng [formGroupName]="i" — truyền index, không phải tên. Đây là chỗ hay nhầm: FormGroup bên trong FormArray được truy cập bằng index, không phải key.
[disabled]="lineItems.length === 1" ngăn xóa dòng cuối cùng — invoice phải có ít nhất một line item. Logic nhỏ nhưng quan trọng cho UX.
calculateTotal() gọi trong template — mình sẽ nói về cách tối ưu phần này ở dưới, vì gọi function trong template có vấn đề performance.
Bước 3: Custom Validators — Validation theo business logic
Validators built-in (required, min, pattern...) chỉ cover được validation cơ bản. Business logic cần custom validator.
Validator cho một field
// validators/invoice.validators.ts
import { AbstractControl, ValidationErrors } from '@angular/forms';

export function futureDateValidator(control: AbstractControl): ValidationErrors | null {
  if (!control.value) return null;

  const inputDate = new Date(control.value);
  const today = new Date();
  today.setHours(0, 0, 0, 0);

  return inputDate >= today ? null : { pastDate: true };
}

export function invoiceNumberValidator(control: AbstractControl): ValidationErrors | null {
  if (!control.value) return null;

  const pattern = /^INV-\d{4}\d{2}-\d{4,}$/;
  return pattern.test(control.value)
    ? null
    : { invalidInvoiceNumber: { expected: 'INV-YYYYMM-XXXX' } };
}
Áp dụng:
this.invoiceForm = this.fb.group({
  invoiceNumber: ['', [Validators.required, invoiceNumberValidator]],
  dueDate: ['', [Validators.required, futureDateValidator]],
  // ...
});
Hiển thị lỗi cụ thể trong template:
<div class="error" *ngIf="invoiceForm.get('dueDate')?.hasError('pastDate')">
  Hạn thanh toán phải là ngày trong tương lai
</div>
<div class="error" *ngIf="invoiceForm.get('invoiceNumber')?.hasError('invalidInvoiceNumber')">
  Sai định dạng. Ví dụ: INV-202602-0001
</div>
Cross-field validator — Validation giữa nhiều field
Đây là lúc Reactive Forms thể hiện sức mạnh. Ví dụ: dueDate phải sau issueDate.
export function dateRangeValidator(group: AbstractControl): ValidationErrors | null {
  const issueDate = group.get('issueDate')?.value;
  const dueDate = group.get('dueDate')?.value;

  if (!issueDate || !dueDate) return null;

  return new Date(dueDate) > new Date(issueDate)
    ? null
    : { invalidDateRange: true };
}
Cross-field validator được đặt ở FormGroup level, không phải FormControl:
this.invoiceForm = this.fb.group({
  issueDate: ['', Validators.required],
  dueDate: ['', [Validators.required, futureDateValidator]],
  // ...
}, { validators: dateRangeValidator });  // Validator cho cả group
<div class="error" *ngIf="invoiceForm.hasError('invalidDateRange')">
  Hạn thanh toán phải sau ngày phát hành
</div>
Lưu ý: error nằm trên invoiceForm, không phải trên dueDate. Đây là chi tiết nhỏ nhưng hay gây confuse — bạn kiểm tra error ở đâu phụ thuộc vào validator được đặt ở level nào.
Bước 4: Async Validators — Validation cần gọi API
Có những validation phải kiểm tra với server: invoice number đã tồn tại chưa, customer có thuộc tenant hiện tại không. Async validator xử lý trường hợp này.
import { AsyncValidatorFn, AbstractControl, ValidationErrors } from '@angular/forms';
import { Observable, of, timer } from 'rxjs';
import { map, switchMap, catchError } from 'rxjs/operators';
import { InvoiceService } from '../services/invoice.service';

export function uniqueInvoiceNumberValidator(
  invoiceService: InvoiceService
): AsyncValidatorFn {
  return (control: AbstractControl): Observable<ValidationErrors | null> => {
    if (!control.value) return of(null);

    // Debounce 500ms — không gọi API mỗi keystroke
    return timer(500).pipe(
      switchMap(() => invoiceService.checkInvoiceNumber(control.value)),
      map(exists => exists ? { duplicateInvoiceNumber: true } : null),
      catchError(() => of(null))  // Nếu API lỗi, không block form
    );
  };
}
Áp dụng — async validator là parameter thứ 3:
this.invoiceForm = this.fb.group({
  invoiceNumber: [
    '',
    [Validators.required, invoiceNumberValidator],        // Sync validators
    [uniqueInvoiceNumberValidator(this.invoiceService)]   // Async validators
  ],
  // ...
});
<!-- Hiển thị loading khi đang validate -->
<div class="checking" *ngIf="invoiceForm.get('invoiceNumber')?.pending">
  Đang kiểm tra...
</div>
<div class="error" *ngIf="invoiceForm.get('invoiceNumber')?.hasError('duplicateInvoiceNumber')">
  Số hóa đơn này đã tồn tại
</div>
Trạng thái pending là thứ template-driven forms không có. Với Reactive Forms, bạn biết chính xác lúc nào validator đang chạy, đã hoàn thành, hay có lỗi — rất quan trọng cho UX.
Mẹo: catchError(() => of(null)) ở trên đảm bảo form không bị stuck ở trạng thái pending nếu API lỗi. Quên dòng này, khi server down user không submit được form — và bạn sẽ mất cả ngày debug tại sao form invalid mà không thấy error nào.
Bước 5: Tính toán tự động — Total, subtotal, tax
Form invoice cần tính toán realtime: thay đổi quantity hoặc unitPrice → line total cập nhật → grand total cập nhật.
Cách sai — Gọi function trong template
<!-- ĐỪNG LÀM THẾ NÀY -->
<span>{{ calculateLineTotal(i) }}</span>
<span>{{ calculateGrandTotal() }}</span>
Function trong template chạy lại mỗi change detection cycle — có thể hàng chục lần mỗi giây. Với form phức tạp, điều này gây lag rõ rệt.
Cách đúng — Subscribe vào valueChanges
export class InvoiceFormComponent implements OnInit, OnDestroy {
  grandTotal = 0;
  private destroy$ = new Subject<void>();

  ngOnInit(): void {
    this.buildForm();

    // Lắng nghe thay đổi từ lineItems
    this.lineItems.valueChanges.pipe(
      takeUntil(this.destroy$)
    ).subscribe(items => {
      this.grandTotal = items.reduce((sum: number, item: any) => {
        return sum + (item.quantity || 0) * (item.unitPrice || 0);
      }, 0);
    });
  }

  ngOnDestroy(): void {
    this.destroy$.next();
    this.destroy$.complete();
  }
}
<!-- Dùng property thay vì gọi function -->
<span>{{ grandTotal | number:'1.0-0' }} VNĐ</span>
grandTotal chỉ được tính lại khi giá trị thực sự thay đổi, không phải mỗi change detection cycle. Hiệu quả hơn rất nhiều.
takeUntil(this.destroy$) là pattern unsubscribe chuẩn — quên unsubscribe sẽ gây memory leak khi component bị destroy. Đây là lỗi kinh điển với Observable trong Angular.
Tính line total cho mỗi dòng
getLineTotal(index: number): number {
  const item = this.lineItems.at(index);
  const qty = item.get('quantity')?.value || 0;
  const price = item.get('unitPrice')?.value || 0;
  return qty * price;
}
Để tránh gọi function trong template, bạn có thể thêm một field lineTotal read-only vào mỗi FormGroup và update nó qua valueChanges:
addLineItem(): void {
  const item = this.fb.group({
    productName: ['', Validators.required],
    quantity: [1, [Validators.required, Validators.min(1)]],
    unitPrice: [0, [Validators.required, Validators.min(0)]],
  });

  // Auto-calculate khi quantity hoặc unitPrice thay đổi
  item.valueChanges.pipe(
    takeUntil(this.destroy$)
  ).subscribe(val => {
    // Cập nhật grand total
    this.recalculateTotal();
  });

  this.lineItems.push(item);
}
Bước 6: Submit — Gửi dữ liệu lên .NET API
onSubmit(): void {
  if (this.invoiceForm.invalid) {
    // Mark tất cả field là touched để hiển thị error
    this.invoiceForm.markAllAsTouched();
    return;
  }

  const formValue = this.invoiceForm.getRawValue();

  const payload = {
    invoiceNumber: formValue.invoiceNumber,
    customerId: formValue.customerId,
    issueDate: formValue.issueDate,
    dueDate: formValue.dueDate,
    notes: formValue.notes,
    lineItems: formValue.lineItems.map((item: any) => ({
      productName: item.productName,
      quantity: item.quantity,
      unitPrice: item.unitPrice,
    }))
  };

  this.invoiceService.create(payload).subscribe({
    next: (result) => {
      this.router.navigate(['/invoices', result.id]);
    },
    error: (err) => {
      if (err.status === 422) {
        // Server validation errors — map vào form
        this.setServerErrors(err.error.errors);
      }
    }
  });
}
markAllAsTouched() là mẹo quan trọng: khi user nhấn Submit mà form invalid, bạn muốn hiển thị tất cả error cùng lúc — không chỉ những field user đã touch. Không có dòng này, error chỉ hiện khi user click vào từng field.
getRawValue() lấy giá trị kể cả từ disabled controls. value property bỏ qua disabled controls — đây là chi tiết nhỏ nhưng gây mất data nếu bạn có field disabled.
Handle server validation errors
setServerErrors(errors: Record<string, string[]>): void {
  Object.keys(errors).forEach(key => {
    // Map "LineItems[0].ProductName" → formArray path
    const control = this.resolveControl(key);
    if (control) {
      control.setErrors({ serverError: errors[key][0] });
    }
  });
}

private resolveControl(path: string): AbstractControl | null {
  // Convert .NET validation path sang Angular form path
  // "LineItems[0].ProductName" → lineItems.0.productName
  const angularPath = path
    .replace(/\[(\d+)\]/g, '.$1')
    .replace(/^([A-Z])/, m => m.toLowerCase())
    .replace(/\.([A-Z])/g, (_, c) => '.' + c.toLowerCase());

  return this.invoiceForm.get(angularPath);
}
Hàm resolveControl convert path từ format .NET (LineItems[0].ProductName) sang format Angular (lineItems.0.productName). Đây là thứ mình phải viết riêng vì hai framework dùng convention khác nhau cho property path — PascalCase vs camelCase, bracket vs dot notation. Không có sẵn trong Angular hay .NET, nhưng cần thiết nếu bạn muốn server validation errors hiển thị đúng field.
Bước 7: Populate form khi Edit
Khi edit invoice, bạn cần load data từ API rồi fill vào form. Đây là chỗ patchValue và FormArray gây nhiều rắc rối nhất.
loadInvoice(id: number): void {
  this.invoiceService.getById(id).subscribe(invoice => {
    // Xóa line items cũ (từ ngOnInit)
    this.lineItems.clear();

    // Tạo FormGroup cho mỗi line item từ API
    invoice.lineItems.forEach(item => {
      this.lineItems.push(this.fb.group({
        id: [item.id],
        productName: [item.productName, Validators.required],
        quantity: [item.quantity, [Validators.required, Validators.min(1)]],
        unitPrice: [item.unitPrice, [Validators.required, Validators.min(0)]],
      }));
    });

    // Patch header fields
    this.invoiceForm.patchValue({
      invoiceNumber: invoice.invoiceNumber,
      customerId: invoice.customerId,
      issueDate: invoice.issueDate,
      dueDate: invoice.dueDate,
      notes: invoice.notes,
    });
  });
}
Sai lầm phổ biến: dùng patchValue cho cả lineItems. patchValue trên FormArray chỉ update các FormGroup đã tồn tại theo index — nó không tự tạo FormGroup mới nếu data từ API có nhiều item hơn form hiện tại. Bạn phải tự tạo FormGroup trước, rồi mới patch.
Đây là lý do mình dùng pattern: clear() → tạo lại từ data → patchValue cho header. Đơn giản hơn việc đối chiếu số lượng item giữa form và data.
Hiển thị error thông minh — Tạo helper tái sử dụng
Viết logic hiển thị error cho mỗi field rất lặp lại. Tạo một helper method hoặc component để tái sử dụng:
// Trong component
getErrorMessage(controlName: string): string | null {
  const control = this.invoiceForm.get(controlName);
  if (!control || !control.touched || control.valid) return null;

  if (control.hasError('required')) return 'Trường này không được để trống';
  if (control.hasError('min')) return `Giá trị tối thiểu là ${control.errors?.['min'].min}`;
  if (control.hasError('pastDate')) return 'Phải là ngày trong tương lai';
  if (control.hasError('invalidDateRange')) return 'Hạn thanh toán phải sau ngày phát hành';
  if (control.hasError('duplicateInvoiceNumber')) return 'Số hóa đơn đã tồn tại';
  if (control.hasError('serverError')) return control.errors?.['serverError'];

  return 'Giá trị không hợp lệ';
}
<!-- Dùng trong template — gọn hơn nhiều -->
<input formControlName="invoiceNumber" />
<div class="error" *ngIf="getErrorMessage('invoiceNumber') as msg">{{ msg }}</div>
Với project lớn, mình tạo riêng một FormErrorComponent nhận FormControl làm input và tự hiển thị error message phù hợp — viết một lần, dùng mọi nơi.
Tips thực tế từ kinh nghiệm dự án
Disable submit khi đang gọi API
isSubmitting = false;

onSubmit(): void {
  if (this.invoiceForm.invalid || this.isSubmitting) return;

  this.isSubmitting = true;
  this.invoiceService.create(payload).subscribe({
    next: () => { /* navigate */ },
    error: () => { this.isSubmitting = false; },
    complete: () => { this.isSubmitting = false; }
  });
}
<button type="submit" [disabled]="invoiceForm.invalid || isSubmitting">
  {{ isSubmitting ? 'Đang xử lý...' : 'Tạo hóa đơn' }}
</button>
Không có flag isSubmitting, user nhấn nút nhiều lần → gọi API nhiều lần → tạo duplicate invoice. Lỗi nhỏ nhưng gây hậu quả nghiêm trọng trên production.
Confirm trước khi rời trang
import { CanDeactivate } from '@angular/router';

export class InvoiceFormComponent {
  canDeactivate(): boolean {
    if (this.invoiceForm.dirty) {
      return confirm('Bạn có thay đổi chưa lưu. Bạn có chắc muốn rời trang?');
    }
    return true;
  }
}
Reset form sau khi submit thành công
// Reset về trạng thái ban đầu
this.invoiceForm.reset();
this.lineItems.clear();
this.addLineItem();  // Thêm lại 1 line item mặc định
reset() xóa giá trị và đặt lại trạng thái pristine, untouched. Nhưng nó không xóa items trong FormArray — bạn phải clear() thủ công.
Kết luận
Reactive Forms phức tạp hơn template-driven, điều đó rõ ràng. Nhưng với form thực tế trong dự án — form có dynamic fields, validation phức tạp, tính toán tự động, interaction với API — Reactive Forms là lựa chọn duy nhất hợp lý.
Pattern quan trọng nhất cần nhớ: dùng FormBuilder để tạo form, getter cho FormArray, valueChanges thay vì function trong template, markAllAsTouched() khi submit, và patchValue kết hợp tạo thủ công FormGroup khi populate FormArray từ API.
Nếu bạn mới bắt đầu, hãy thử xây lại form phức tạp nhất trong project hiện tại bằng Reactive Forms. Không cần hoàn hảo ngay lần đầu — quan trọng là cảm nhận được sự khác biệt về khả năng kiểm soát so với template-driven. Khi đã quen, bạn sẽ không muốn quay lại.

Leave a comment
Your email address will not be published. Required fields are marked *